> ## Documentation Index
> Fetch the complete documentation index at: https://docs.choicely.com/llms.txt
> Use this file to discover all available pages before exploring further.
# Custom View
> Integrate your own custom views into Choicely SDK for iOS
## Add Custom view to your project
1. Create a class that conforms to `ChoicelyExternalViewControllerFactory` protocol:
```swift theme={null}
class YourCustomViewControllerFactory: ChoicelyExternalViewControllerFactory {
func createViewController(choicelyNavigationitem: ChoicelyNavigationItem?) -> ChoicelyController? {
return nil
}
}
```
2. Declare all your custom views usage inside it's `createViewController()` method:
```swift UIKit theme={null}
let yourCustomUrl = "choicely://special/your_custom_url"
let internalUrl = choicelyNavigationitem?.internalUrl
if internalUrl.contains(yourCustomUrl) == true {
return YourCustomViewController()
}
// In order to return YourCustomViewController make it a subclass of ChoicelyViewController.
```
```swift SwiftUI theme={null}
let yourCustomUrl = "choicely://special/your_custom_url"
let internalUrl = choicelyNavigationitem?.internalUrl
if internalUrl.contains(yourCustomUrl) == true {
return ChoicelyView { YourCustomView() }
}
// ChoicelyView is a wrapper that will return ChoicelyViewController from any SwiftUI view.
```
Custom navigation URLs like `"choicely://special/your_custom_url"` can be set and configured in Choicely Studio.
This is how you can create custom navigation URLs:
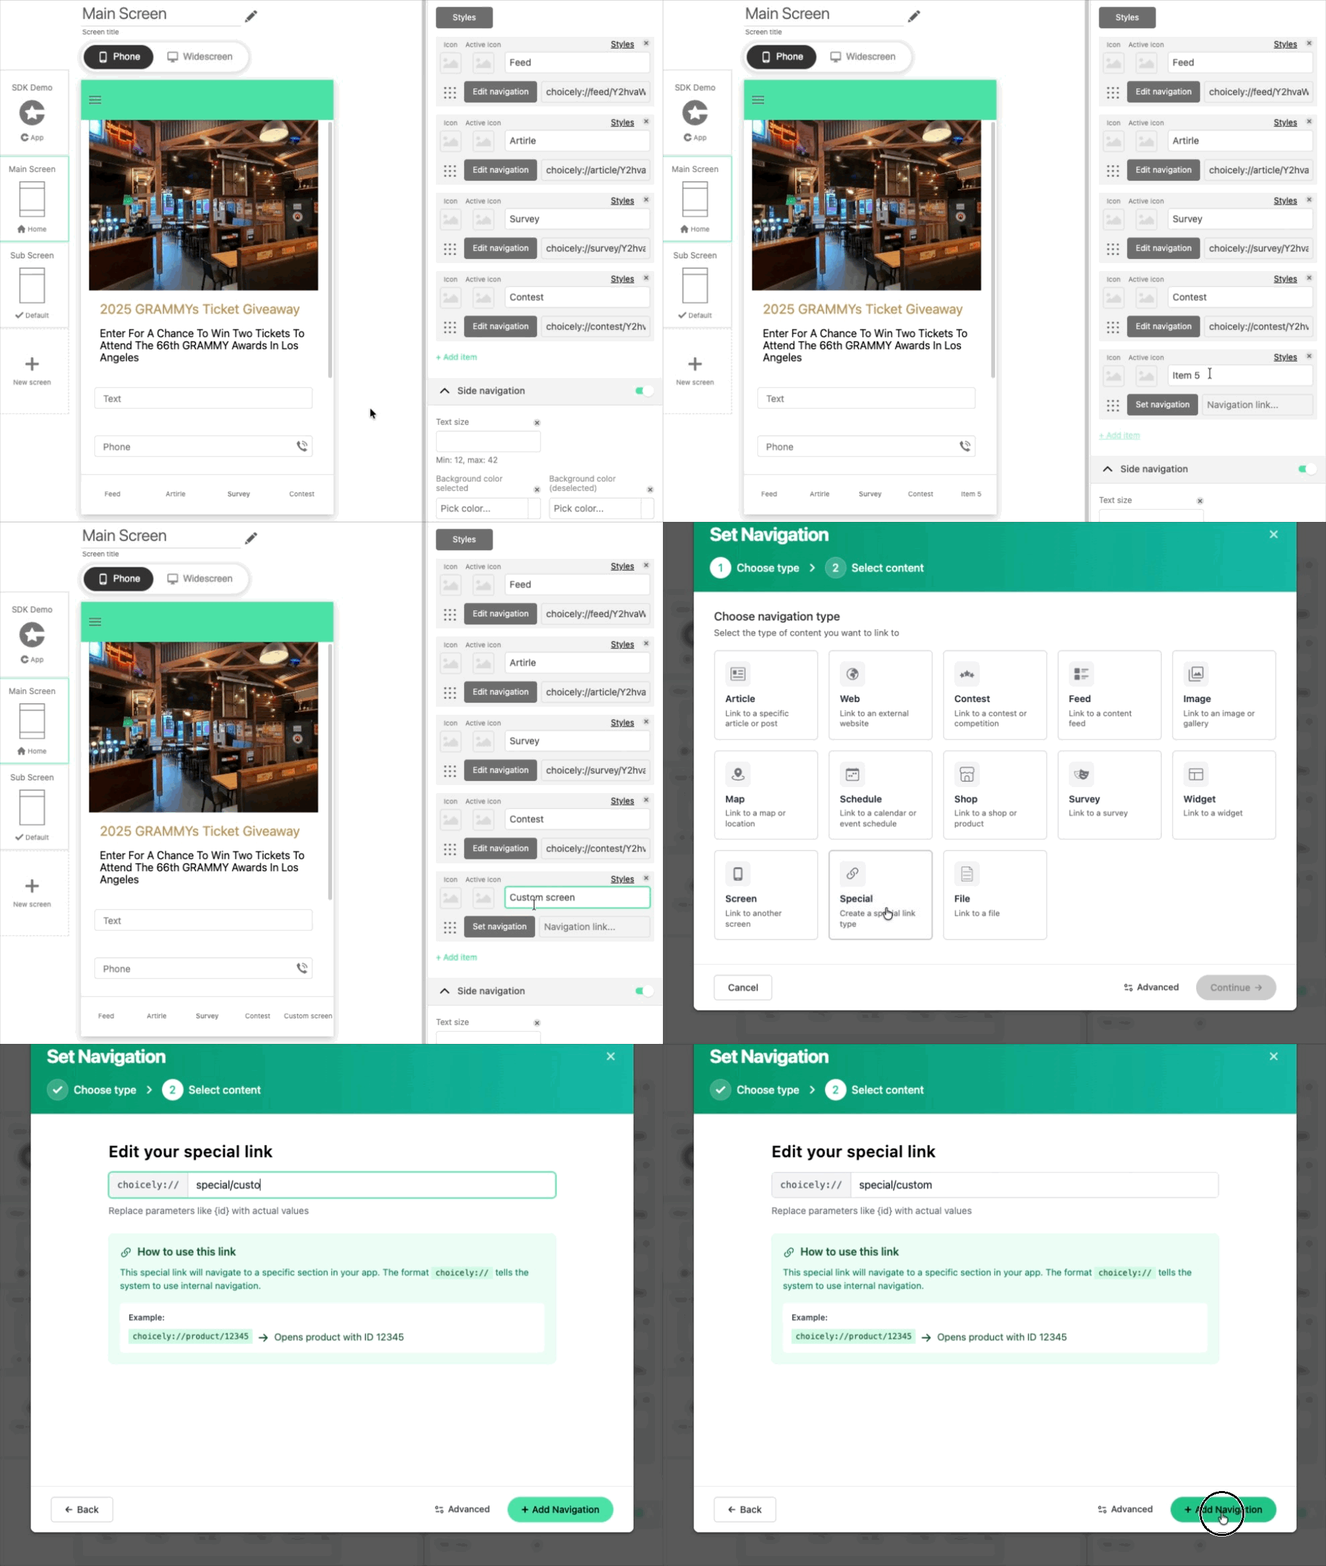 3. Set the custom url, click "Add Navigation" and save the changes by clicking "Update" button in the top right corner.
4. Here is the example of fully configured `ChoicelyExternalViewControllerFactory`:
```swift UIKit theme={null}
import ChoicelyCore
class YourCustomViewControllerFactory: ChoicelyExternalViewControllerFactory {
func createViewController(choicelyNavigationitem: ChoicelyNavigationItem?) -> ChoicelyController? {
let yourCustomUrl = "choicely://special/your_custom_url"
let internalUrl = choicelyNavigationitem?.internalUrl
if internalUrl.contains(yourCustomUrl) == true {
return YourCustomViewController()
}
return nil
}
}
```
```swift SwiftUI theme={null}
import ChoicelyCore
class YourCustomViewControllerFactory: ChoicelyExternalViewControllerFactory {
func createViewController(choicelyNavigationitem: ChoicelyNavigationItem?) -> ChoicelyController? {
let yourCustomUrl = "choicely://special/your_custom_url"
let internalUrl = choicelyNavigationitem?.internalUrl
if internalUrl.contains(yourCustomUrl) == true {
return ChoicelyView { YourCustomView() }
}
return nil
}
}
```
5. Create an instance of `YourCustomViewControllerFactory` class and just before `ChoicelySDK.initialize(...)` assign it to `ChoicelySDK.settings.externalViewControllerFactory`:
```swift theme={null}
ChoicelySDK.settings.externalViewControllerFactory = YourCustomViewControllerFactory()
```
To learn more about other ChoicelySDK settings explore them in XCode with `(⌥)+click`.
6. That's it! You're ready to use your custom views.
You can mix Choicely content like `Articles` and `Surveys` with your own UI logic inside one custom view.
3. Set the custom url, click "Add Navigation" and save the changes by clicking "Update" button in the top right corner.
4. Here is the example of fully configured `ChoicelyExternalViewControllerFactory`:
```swift UIKit theme={null}
import ChoicelyCore
class YourCustomViewControllerFactory: ChoicelyExternalViewControllerFactory {
func createViewController(choicelyNavigationitem: ChoicelyNavigationItem?) -> ChoicelyController? {
let yourCustomUrl = "choicely://special/your_custom_url"
let internalUrl = choicelyNavigationitem?.internalUrl
if internalUrl.contains(yourCustomUrl) == true {
return YourCustomViewController()
}
return nil
}
}
```
```swift SwiftUI theme={null}
import ChoicelyCore
class YourCustomViewControllerFactory: ChoicelyExternalViewControllerFactory {
func createViewController(choicelyNavigationitem: ChoicelyNavigationItem?) -> ChoicelyController? {
let yourCustomUrl = "choicely://special/your_custom_url"
let internalUrl = choicelyNavigationitem?.internalUrl
if internalUrl.contains(yourCustomUrl) == true {
return ChoicelyView { YourCustomView() }
}
return nil
}
}
```
5. Create an instance of `YourCustomViewControllerFactory` class and just before `ChoicelySDK.initialize(...)` assign it to `ChoicelySDK.settings.externalViewControllerFactory`:
```swift theme={null}
ChoicelySDK.settings.externalViewControllerFactory = YourCustomViewControllerFactory()
```
To learn more about other ChoicelySDK settings explore them in XCode with `(⌥)+click`.
6. That's it! You're ready to use your custom views.
You can mix Choicely content like `Articles` and `Surveys` with your own UI logic inside one custom view.