Features
- In-App Purchases – Allow users to buy items, upgrades, or digital content inside your app.
- Subscriptions – Offer recurring subscription plans to give users ongoing access to premium features or content.
- Paid Votes – Monetize voting by enabling users to purchase voting credits, which can be used in competitions or polls.
Add the Shop module to your project
If you haven’t added the Choicely SDK to your project yet, please follow the steps in the Quick start section.
-
Add the Shop dependency next to
android-corein your app-levelbuild.gradlefile. The BOM keeps both on matching versions. -
That’s it! No code is needed:
ChoicelySDK.init(...)in yourApplicationclass finds the Shop module and turns it on. The Google Play Billing library and itscom.android.vending.BILLINGpermission come with the module.
Connect Google Play to Choicely
The Choicely server checks every purchase with Google Play before it grants anything, so it needs your app’s package name and a Google service account that may read your app’s orders.The SDK finishes a purchase on Google Play (consumes or acknowledges it) only after the Choicely server has recorded it. If the server never confirms a purchase, Google Play refunds it automatically, so users are never charged for something they did not get.
Google Cloud
- In the Google Cloud console, select (or create) a project and enable the Google Play Android Developer API for it.
- Go to “IAM & Admin” -> “Service Accounts” and click “Create service account”. Give it a name (can be anything) and finish the wizard without granting it any project roles.
- Open the new service account, go to the “Keys” tab, click “Add key” -> “Create new key”, choose JSON and download the key file. Keep this file safe: it gives access to your app’s orders.
Google Play Console
-
In Google Play Console go to “Users and permissions” and click “Invite new users”. Enter the service account’s email address (
...@...iam.gserviceaccount.com, shown in the key file asclient_email). - Under “App permissions” add your app and allow View financial data, orders, and cancellation survey responses and Manage orders and subscriptions. Click “Invite user” and confirm.
It can take up to 24 hours before Google Play accepts a newly invited service account. Purchases made before that cannot be verified yet.
Choicely Studio
- In Choicely Studio select your app, go to “Settings” -> “General Settings” and click Google Play settings.
-
Check that the package name is your app’s
applicationId. - Under Google Play service account key (in-app purchases) upload the JSON key file (or paste its contents) and click “Save”.
This key is used only to verify in-app purchases. Choicely never publishes your app with it.
Setup In-App Purchases
Google Play Console
Google Play lets you create products only after you have uploaded a build that contains the Billing library. Upload a build with the Shop module to a testing track (for example Internal testing) first.
- In your app’s Google Play Console page, go to “Monetize with Play” -> “Products” -> “One-time products” and click “Create one-time product”.
- Enter a Product ID (this is the Play ID you will add to Choicely Studio), a name and a description, then set the price and availability.
- Save and activate the product.
Choicely Studio
- In Choicely Studio select your app, go to “Settings” tab on top and select “In-App Purchases”.
- Create as many packages as you need.
-
Enter the Product ID you created in Google Play Console in the package’s Play ID field. (The Store ID field is for the App Store product ID of your iOS app.)
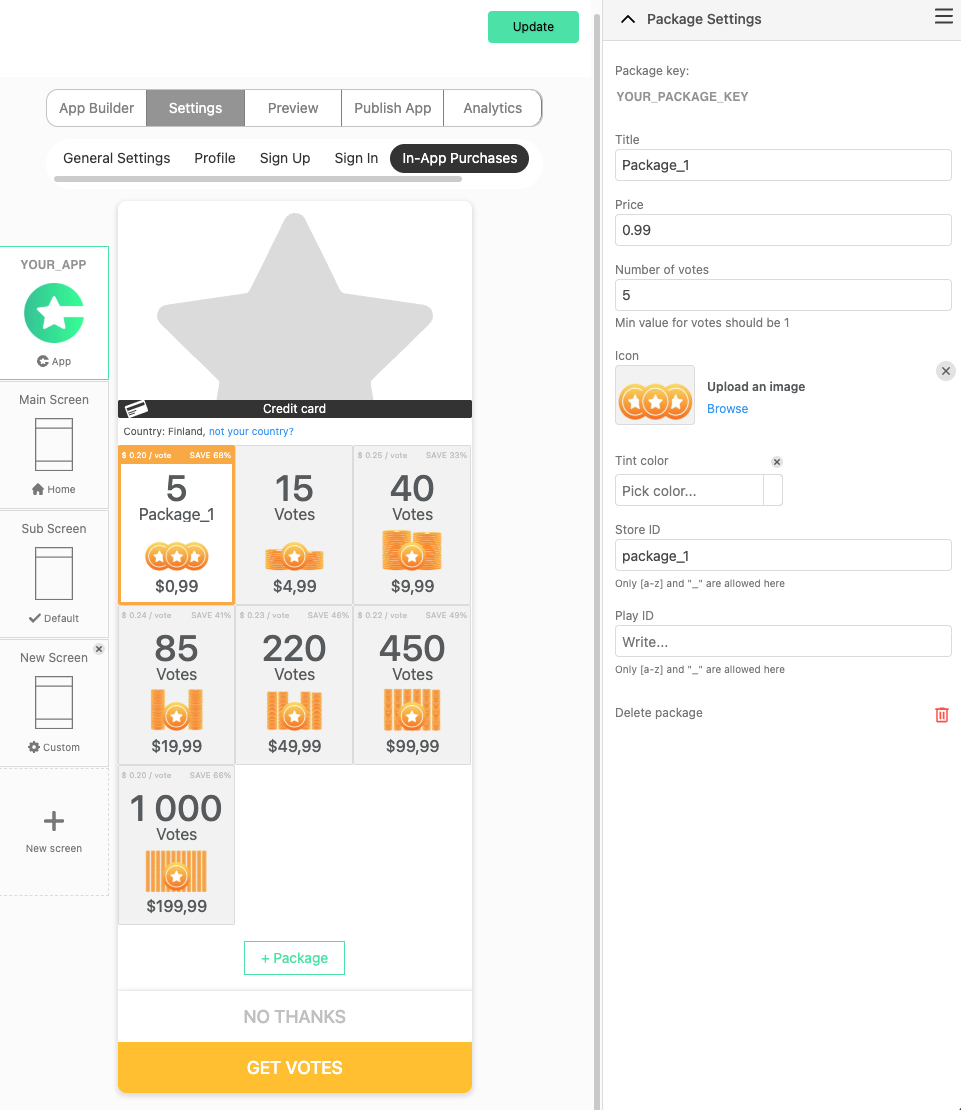
- Click “Update” button in the top right corner.
- That’s it! You’re now ready to start using in-app purchases in your app.
Setup Subscriptions
Google Play Console
- In your app’s Google Play Console page, go to “Monetize with Play” -> “Products” -> “Subscriptions” and click “Create subscription”.
- Enter a Product ID (this is the Play ID you will add to Choicely Studio) and a name, then click “Create”.
- Add a base plan: set its billing period (for example monthly), renewal type, prices and availability, then activate it.
Choicely Studio
-
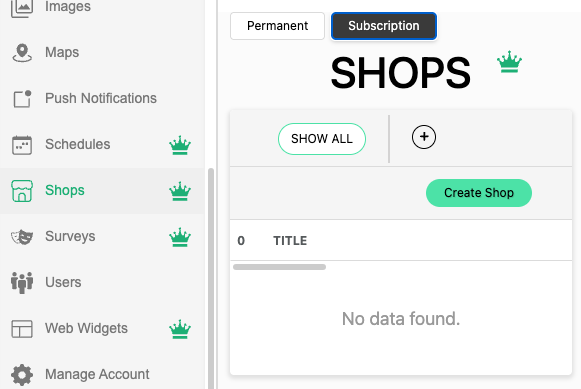
In your app’s Choicely Studio select “Shop” section in the side menu. Select “Subscription” tab and click “Create Shop” button. Confirm that you want to create a new subscription shop.
-
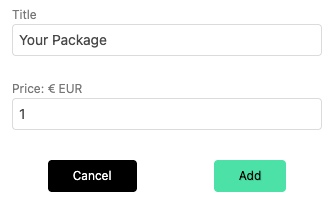
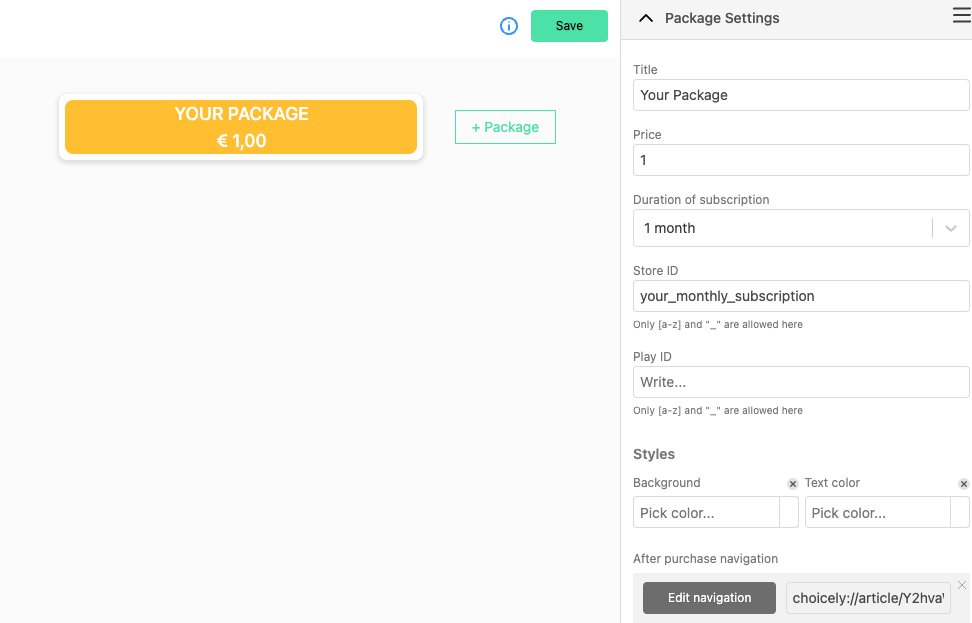
You will see a blank package and a button with ”+ Package” title. Click on it and enter the package’s title and price.
-
Click “Add” button and you will see your newly created subscription package with all its options. Set its duration, Play ID (the subscription’s Product ID from Google Play Console) and navigation. The Store ID field is for the App Store product ID of your iOS app.
- Click “Update” button in the top right corner.
- That’s it! You’re now ready to start using subscriptions in your app. Make sure Google Play is connected to Choicely (see Connect Google Play to Choicely): subscriptions are verified and renewed through it.
Test purchases
- In Google Play Console go to “Settings” -> “License testing” and add the Google accounts you test with. Their purchases use test cards and are never charged.
- Install the app from your testing track (for example Internal testing) with one of those accounts and buy a package.
- In Choicely Studio the purchase appears in your shop once the Choicely server has verified it.